Pure Data Sequencer
26 Nov 2017 ~13 minutes
In this post I’d like to present a patch I made for Pure Data, namely a sequencer.
Pure What?
Pure Data (Pd) is a visual programming language developed by Miller Puckette in the 1990s for creating interactive computer music and multimedia works. - Wikipedia
Coming from a text-based programming experience, it’s a connect box with lines type of programming game. Although I am relatively new to this technology, I can already tell that it’s a lot of fun to play with!
You can download the version you want here and I highly recommend looking at this video series.
I assume that you already have some knowledge of Pure Data. If it’s not the case, please have a look at this, this and that.
Amuse-bouche
Here’s what we’ll build you in this post:
Intro and subpatches
In this part, I’ll introduce some concepts behind Pd and showing some subpatch we’ll be using for the sequencer.
A subpatch can be see as a subroutine (although it has many unique characteristics), you extract a piece of code into a box, to make it reusable.
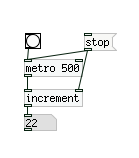
Increment
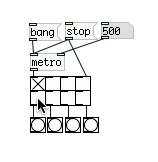
In Pd, there’s a common way to create a loop, with an increment index, is to use a [metro] object along with a [float] and a [+].
Look at the following patch:
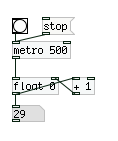
The [metro] will emit a bang every 500 ms. The [float] will send its value to the number display below it and to the [+ 1]. This is where it gets tricky: the [+ 1] computes the input value plus one, and send this to the [float]’s cold inlet.
An object in Pd will only do something if its hot inlet has been triggered, it was the case when the [metro] sent a bang to the [float].
So the new value is stored inside [float], waiting for the next bang to pass it to the number below.
To start the [metro], use the [O] (a bang object), and to stop it, use the [stop( message (we’ll talk about messages later, don’t worry about it now.).
OK, the first subpatch we’re creating is the following:
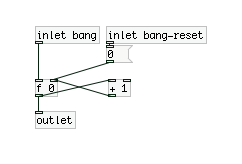
You should understand most of it: it’s abstracting the [float]/[+]. The new elements are the [inlet] and [outlet], they are the inputs and output of the subpatch. Save this as increment.pd, add it to your path and now you can use it in the following manner:
More on subpatches here.
Count-to
The second subpatch we want to create is another really simple one. It counts to a specified value and output all numbers from 0 to that value. Before looking below, have a think of how you would do it! It’s good practice to reinvent the wheel when learning something new!
Here’s my patch:
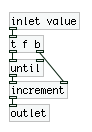
You know most of it already, but two new box are used here:
[until]: This box emits a number of bangs, determined by its hot input. It’s especially useful when you want to send a specific number of bangs.[t f b]: This is a[trigger]box. It will send a signal from right to left outlet. The parameters indicates the types of the value to send (here it’s afloatand abang). It’s a primordial box, because it’s allowing for a better control over the execution.
Can you now understand the full patch? Here’s a breakdown:
The [inlet value] gets the number you want to count to. The trigger first sends a bang to the [increment] box, which resets its internal value (see above for details). Then it sends the float to [until] which in turns sends multiple bangs to the [increment]’s hot inlet. Finally its value is sent out of the patch.
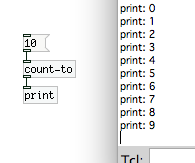
And here’s a demo:
That’s enough for the intro, let’s get into it!
Sequencer
Goal and Setup
Let’s clarify first what we intend to do here, it’ll help us a lot later.
The goal of this patch is to create a step sequencer. The input will be:
- A clock tick, so we can synchronize the patch with the outside world.
- A reset bang, for when we want to go back from the start.
The outputs will be:
- An outlet per track, so we can see the outlet emit a
bangwhen it’s on.
You can see the result, it’s sending bang to one outlet at a time. I’m changing the tempo, starting and stopping it with messages.
Wait! I can’t see inside the box…
I know, let’s build it, one step at a time.
For the purpose of this post, we’ll limit our sequencer to 4 tracks, but it’ll be easy to extend it later.
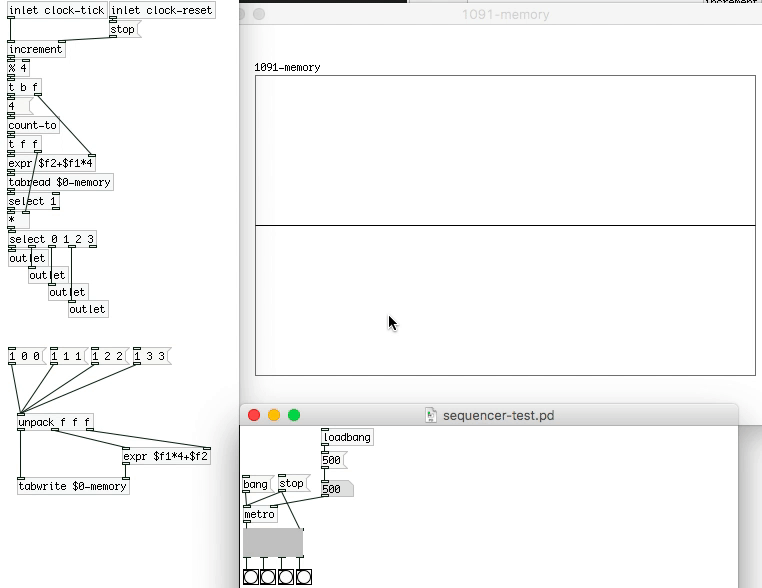
Patch Setup and counter
Let’s first handle the inputs, we’re getting a bang every so often and we need to convert that to a time in our sequencer. We will use an [increment] and a [% 4] box, like so. And we need then to have 4 outlets, I’ll add them now, along with a [select 0 1 2 3] box:
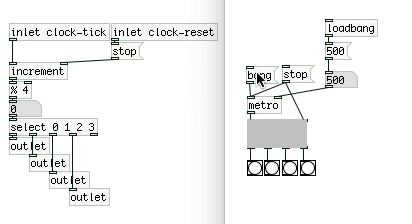
The [select] box is quite simple, it will send a bang to the output corresponding to the input value.
This is neat and all but we can’t control our sequencer!
No problem, let’s talk about memory now.
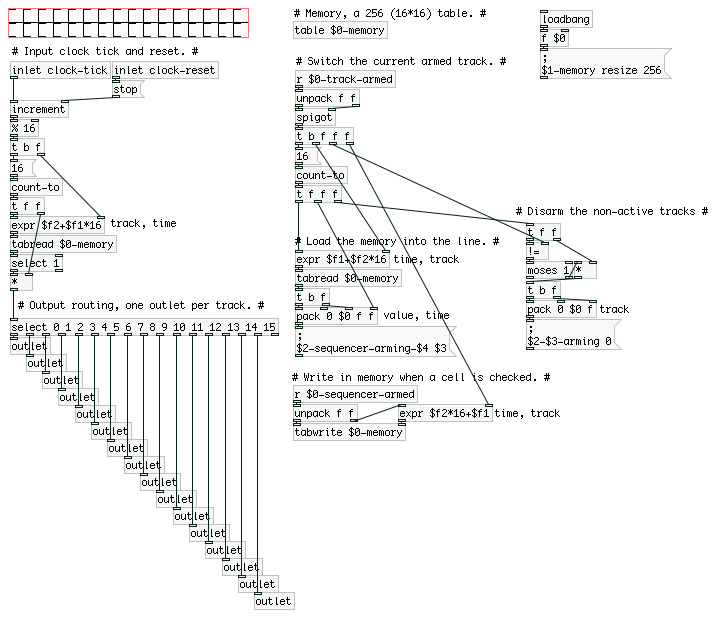
Memory
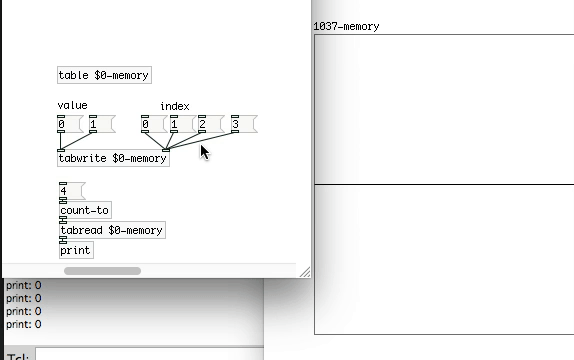
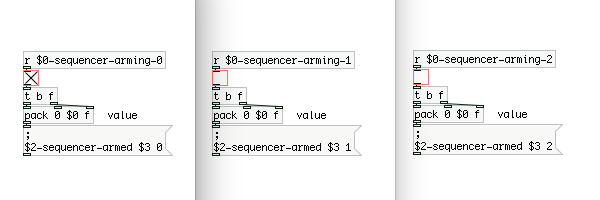
In order to store informations in Pd, you have different options, [toggle], [table], … We’ll use a table, for its read/write simplicity.
We need to store 4 tracks * 4 steps, so 16 values. I used a single [table] and then some maths to get the right index. This allows us to later change the size of our system without having to add anything else.
To read from a [table], you can use the [tabread tablename] with the hot inlet specifying the index to read from. And to write into it, you can use the [tabwrite tablename] with the cold inlet specifying the index to write to and the hot inlet the value to write.
Here’s an example:
To write our 16 values, we’ll use the following math expression: index = track * 4 + time. This is a good opportunity to introduce a new box: the [expr] box. If you’ve done any programming at some point, you’ll understand what this does:
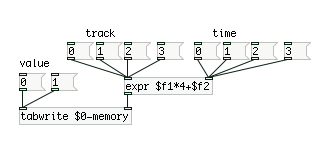
This box allows to do some computation, with specified inputs, and send the result of the computation to the output. We have the formula to address our memory, let’s use that to read our sequence.
Reading the sequence
Now is the time to do something useful: write the complete code to play the saved sequences.
Let’s start with what we already have: we can read and write to our [table]. We can loop over a sequence of numbers, we only need some logic box and we’ll be all set!
The circuit we’re going to build is following this logic:
- Input the current time
- For every tracks
- If the value is 1
- Send the track number
- Send a bang to the corresponding outlet
- If the value is 1
And here’s the full circuit:

What’s new here are the following boxes: [select] and [*]. (and some variations on the [t] box)
The [*] is simply a times operation, in the same way as the [%] which was a modulo operation.
The [select 1] box is a little more interesting here. It’s acting as a check and will send a 1 to the next box only if it receive one. This followed by a [*] is a neat way to send the track number if it’s active for the current step.
What’s more? Oh yes! Trigger! I spent an awful lot of time on this because one outlet was linked to two outlets. It doesn’t seem to be that big of a deal, but look at the following examples:
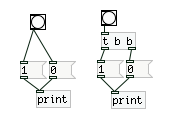
On the left side, you can’t tell which number will be printed first (but I can, it’s the 0 because I link the bang to it first). On the right side you can tell, because a trigger always send from right to left. Don’t be like me, use triggers.
Let’s go back to our reading, and have a look at what we have now, with a new test:
With the different messages I’m writing into memory to play on track 0, time 0, on track 1, time 1, …
We could add all required messages for writing, then the message to erase part of the memory (writing a 0 that is), and we’d have our sequencer. Quite simple, quite neat indeed.
But one aspect of this patch is to be able to have a UI a bit better than just messages, and we shouldn’t have to see the memory all the time. There’s more work to do!
Message and Scope
You may be aware of the [send] and [receive] block and their functionality. If not, look at the following example:
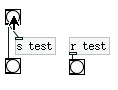
As you probably guessed, you can do a wireless connection using a pair of [s]/[r] boxes, using the same name, simple right? Well, let see a more complex example:
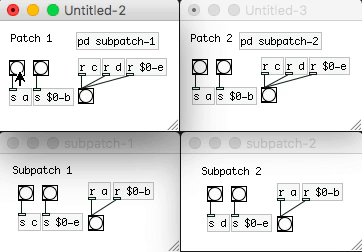
There’s a lot going on here, let’s take it one step at a time. We have two independent patches, each of which contains a subpatch. Some [send] are using a normal name and some are adding a $0- in front. The logics are:
- The
[s a]will be received by all[r a], this is called the global scope. From a patch and subpatches to all patches and subpatches. - The
[s $0-a]will be received by only the parent patches and children subpatches. Look how they’re triggering, only on the same patches.
The reason is the following: $0 has a special meaning in Pd, it will be replaced by a unique identifier per patch. Look again at the memory definition:
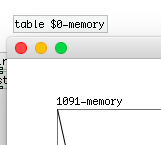
You can see the id of the patch, it’s transparently replaced by Pd to bound the scope of the wireless communication.
All good? OK, let’s take it one step further.
Let say we need to send the value Y to [r $0-X], where X, Y are dynamics. One solution could be:
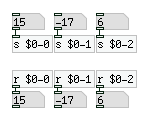
This is fine, but imagine you have 16 inputs, it would be a lot more boxes. Although we can’t create dynamic [r], we can create dynamic [s]:
OK, maybe it’s not so clear… The [; $2-$4 $3 ( is doing the send. If you replace the $x with the corresponding input in the packed list, you’ll have something like: [; $0-2 9 (. This is a special case for messages, it sends the value 9 to all [r $0-2].
It may not seems that better, but when you’ll have dozen of sending to do, you’ll be happy to have a dynamic system like this one.
One note on the [pack 0 $0 ...]: because the $0 is using the same format as the variables passed in a message box, it would lead to errors, we have to make it clear that we want its value. To do that we pack it (in the pack, the real value will be used) along with other variables, and we can use it as $2 in the message.
UI
Let’s go back to the UI of our sequencer:
As you can see, the whole UI is made of two rows of [toggle] boxes. The first one is selecting the track you want to program, the second one controls the steps, active or inactive of the sequence.
We will start by building the second row:
Sequencer row
The row of toggle serves a dual function: first it’s a visual clue of what is active and what is not, and then it’s a simple way to set the memory, because each toggle will point to a place in memory to setup.
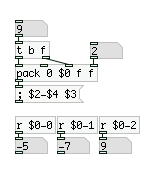
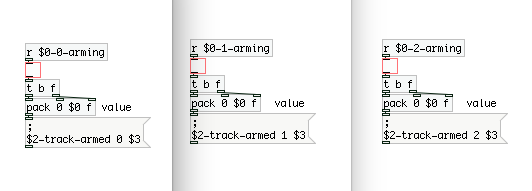
We could link the toggle to a write message directly, but it would be against our purpose of simplicity. Instead let’s create a subpatch for each toggle:
You can see that the patches are mostly similar, but numbers are changing here and there, it’s to identify the current toggle being pressed. It’s a shame that we can’t create dynamic toggle, nor dynamic receive, because we’ll have to create manually all of those. Copy and paste will help, but we’d have to make sure that all numbers are correct. Anyway…
We’re sending this toggle information to a [r] that will write to memory, I propose we do that now. The circuit is quite simple:
It’s starting to take form! We can now control the memory from toggles. But there are a few different problems:
- The row doesn’t reflect the current memory for the track.
- It’s not clear which track we are on.
As you can guess those are our two next (and final!) steps.
Track row
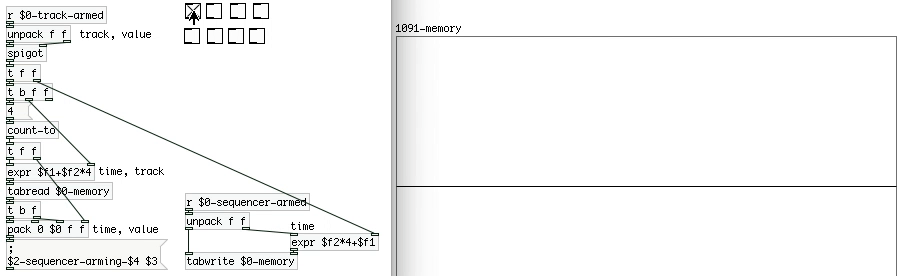
We are now going to handle the track-selection and its display. This is going to look quite the same from the sequencer row:
The logic is the same, we’re sending the values to a different receiver though. This receiver will act only if the track is actually checked, nothing should happened if a track is unchecked. Then the track number will be sent to the [expr]. The new box used is a [spigot], it will pass it’s hot inlet’s value only if the cold one is 1:

It’s better, but we still have to load the current track in the sequencer. This piece of work looks quite similar to the play part we did earlier: it will look inside the memory for the current track and send to the sequencer toggles their new value:
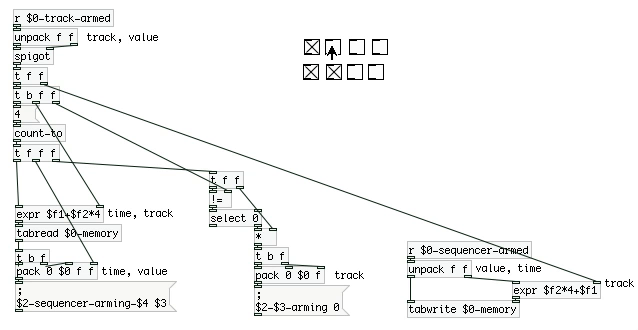
And to end this, let’s add the logic to un-arm all non-active tracks. It’s a matter of unchecking all non-current tracks, this is done with blocks you already know, so I’ll only post an image of it:
Wrapping up
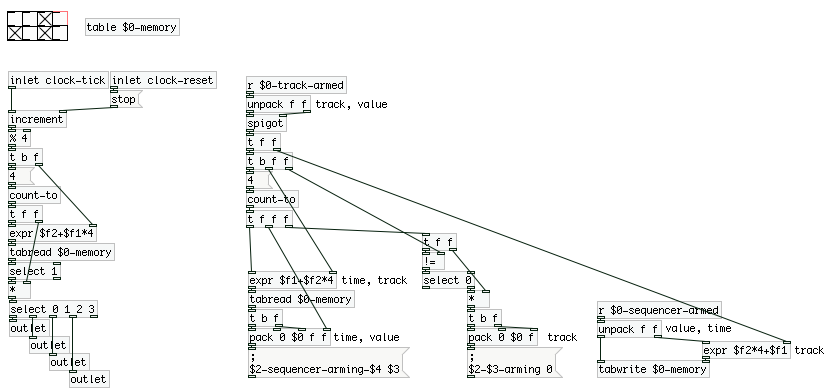
It’s alive! Let see our final patch:
You can now create an UI that fits your taste and go play with the sequencer!
I want more!
I’ll admit that a 4*4 sequencer is quite small, but you can take it to another dimension quite simply.
You’ll have to add as many toggles as you want, keeping in mind to change all number inside the subpatches. Add number to the select and add your outlets. Also don’t forget to change every 4 with your new dimension.
For example, here’s a 16*16 one:

You can find the final patch here.