Cube
16 Nov 2017 ~7 minutes
This blog post presents the little toy I made while exploring the HTML5’s canvas and a cube’s visualisation with changing perspectives.
You can see the result here: Cube.
Preparing the canvas and brushes
Let start with the canvas wrapper, the non-cube side of the project.
After getting the canvas and its context, we set fixed sizes for various elements of the page:
const canvas = document.getElementById("canvas");
const ctx = canvas.getContext("2d");
const HEIGHT = canvas.height;
const WIDTH = canvas.width;
const pointSize = 10;
var debug = true;
var step = 0;
Next, a few different functions to clear/display stuff on the canvas:
function clearCanvas(){
	ctx.fillStyle = 'white';
	ctx.fillRect(0, 0, WIDTH, HEIGHT);
}

function drawPoint(point){
	ctx.fillStyle = 'black';
	ctx.fillRect(point.x - pointSize/2, point.y - pointSize/2, pointSize, pointSize);
}

function drawLines(lines, debug){
	if(debug){
		ctx.strokeStyle = 'grey';
		ctx.setLineDash([4, 4]);
		ctx.lineWidth=1;
	} else {
		ctx.strokeStyle = 'black';
		ctx.setLineDash([]);
		ctx.lineWidth=3;
	}
	ctx.beginPath();
	lines.forEach(points => {
		ctx.moveTo(points[0].x, points[0].y);
		ctx.lineTo(points[1].x, points[1].y);
	});
	ctx.stroke();
}
The drawLines functions will be used to print the debug lines and the cube’s lines, with different styles. Also, since we’re displaying a large number of lines, we can do this in one stroke.
Next, let see the mouse handling, wrapped into 3 little functions. The first of is the proxyEvent:
function proxyEvent(event, callback){
	canvas[event] = (e) => callback(e.pageX - canvas.offsetLeft, e.pageY - canvas.offsetTop);
}
This function will add a new listener to the canvas and will callback the passed function with the x and y of the canvas, and not the page. It’s used like so:
function generateMouseMoveHandler(point){
	proxyEvent('onmousemove', function(x, y){
		point.x = x;
		point.y = y;
	});

	// Mouse up clears the mouse move handle.
	canvas.onmouseup = () => canvas.onmousemove = undefined;
}

proxyEvent('onmousedown', function(x, y){
	if(distanceTo(x, y, handle1) < 300) {
		generateMouseMoveHandler(handle1);
	} else if(distanceTo(x, y, handle2) < 300) {
		generateMouseMoveHandler(handle2);
	} else if(distanceTo(x, y, handle3) < 300) {
		generateMouseMoveHandler(handle3);
	}
});
For the mousedown we’re using the proxy to compare the mouse’s coordinate with the three handles, and calling generateMouseMoveHandler, which is really a grab that handle function.
It’s adding, using the proxy, a mousemove event and setting the new position of the point. Also, when the mouseup event is called, the previously defined mousemove handler is removed.
Finally, the obligatory requestAnimationFrame, as simple as:
(function animationFrame() {
	window.requestAnimationFrame(animationFrame);
	render();
})()
And a few event handlers, nothing too much.
changeDebug = e => debug = e.checked;
changeStep  = s => {
	step = s;
	document.getElementsByClassName('displayed')[0].classList.remove('displayed');
	document.getElementById('step'+step).classList.add('displayed');
}
A happy little cube
Now on the cube’s side, and let’s start with the render function:
function render(){
	clearCanvas();

	middle1 = computeMiddle(handle1, center)
	middle2 = computeMiddle(handle2, center)
	middle3 = computeMiddle(handle3, center)

	intersection1 = computeIntersection(handle1, middle2, handle2, middle1)
	intersection2 = computeIntersection(handle2, middle3, handle3, middle2)
	intersection3 = computeIntersection(handle1, middle3, handle3, middle1)

	center2 = computeIntersection(handle1, intersection2, handle2, intersection3);

	// Draw stuff
	// ...
}
I won’t get into the drawing part, it’s only a matter of drawPoint and drawLines, what’s interesting is the logic to attain the cube’s points.
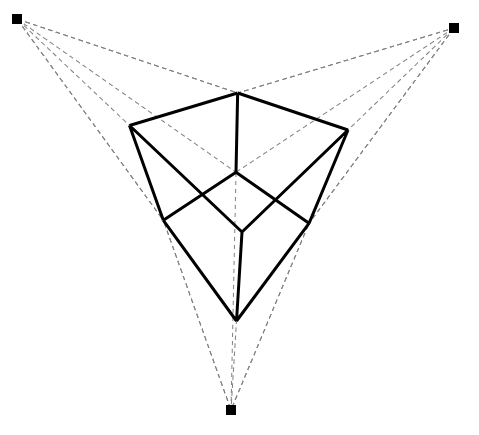
First, the three handles are really the three vanishing points of the scene, and the only fixed point of the cube is the “front center”. We can get corners linked to the center by taking the middle point of the “center/vanishing point” line. This is done with rather simple vector calculus:
function computeMiddle(point1, point2){
	return {
		x: point2.x/2 + point1.x/2,
		y: point2.y/2 + point1.y/2,
	};
}
Then, we need the first “parallel” lines. Parallel is quoted here because although a cube has parallel lines, in the 3-vanishing-points-perspective none of those lines are parallels. They are built by joining the middle points with the handles. We get from this all the “front” and “top” vertex. Ultimately where the “top”/”front” is depends on how you view the cube. This doesn’t involve any math, because we’re not creating any new points.
The next step is to get the intersections for the back points, this is done with the following piece of code:
function computeIntersection(point1, point2, point3, point4){
	let d = (point1.x - point2.x)*(point3.y - point4.y) - (point3.x - point4.x)*(point1.y - point2.y);
	let t = (point1.x*point2.y-point1.y*point2.x)/d;
	let s = (point3.x*point4.y-point3.y*point4.x)/d;

	return {
		x: (point3.x-point4.x)*t-(point1.x-point2.x)*s,
		y: (point3.y-point4.y)*t-(point1.y-point2.y)*s
	};
}
This is an adaptation of the formula found here. This function will allows us to find all the “back” points, the center and the three corners, completing the cube.
We can now trace all the vertex and our cube is complete.
Again to see the result, go here: https://nobe4.fr/cube.